Many of us out there have often thought, what if I had my own business? I could be my own boss and never have to worry ever again about being late for work or commuting to a job I don't like. The dreams take on a life of their own. I was once like that myself working dead end jobs that barely covered the bills. Don't get me wrong, I did enjoy some of the jobs I've held over the years but putting in all of that effort and work ethic for someone else never really made sense to me when I could be doing that for myself. The freedom that comes with self employment does come with a price though. Especially in this kind of industry.
There are many times that you will feel obligated to take on jobs because there is no other work coming your way at a lesser rate than you would normally charge. That is fine except you set a dangerous precedent. All pricing to some extent is negotiable but remember that your customers are coming to you because you are a professional. You have the skills and the talent that many others don't have. That is worth something.
Don't ever sell yourself short on what you are capable of. If you're not sure of how to do something there are lots of resources out there that can help you. When I first started out, my vinyl supplier ND Graphics down in Toronto was my best resource. I spoke with Zul on quite a number of occasions and he was always willing to give me any information I required. I still use them to this day because of their outstanding customer service and knowledge.
Believe me when I say that for a while unless you're an absolute marketing genius or have the money up front to hire one, times will be tough when you start out. Some people will tell you that you should give up. Some people will tell you that if you aren't pulling in all kinds of money that it is all a pipe dream. I've heard all of this and more but I take it on as a personal challenge to be that much more successful. Associate yourself with people who are successful and with people who are supportive of whatever business venture you take on.
There is a phrase that I like to say to people, "Your life is a story that you are writing day to day. It is up to you if you want the story to be a happy one or not."
I don't fall into the same old traps that I used to any more. If something isn't working then I try to do something different. If you're wallowing at home because you don't have customers calling you, go out and look for them. Find a business that has an old sign or a sign that you know you could make better. Design it up and approach them. If they say no, then at least you've tried. In the least, you've honed some more of your designing skills and most likely caught the attention of the business owner and made them aware of their sign . Leave your business card and then go out and find another one. Put your mark in your area. Be proud. Let people know you exist and what you can offer them. Your success or lack thereof are a direct result of your actions. Write a great story for yourselves my friends and as always, stay creative.

Friday, 30 December 2011
Tuesday, 27 December 2011
Airbrushing for a cause part4
Well, all of the work on the guitar has definitely paid off. I let the clear coat cure over the Christmas break. After smoothing with 1000 grit wet sand I switched to 2000 grit. I was really happy with the smooth finish and gave it a couple more light coats to bring the shine back up. After that cured over night, I polished it up with some Meguiars Gold Class paste wax to really bring out and protect the finish. I polished up the chrome hardware with Brasso. Here is a look at the finished product.


Please go to www.facebook.com/groups/207215582668209/
for more info about how to have a chance to win this labour of love. Stay creative my friends


for more info about how to have a chance to win this labour of love. Stay creative my friends
Sunday, 25 December 2011
Holiday Wishes
Just wanted to stop in and wish everyone a safe and happy holidays from Christoff Creations
Wednesday, 21 December 2011
Airbrushing for a cause part3
The guitar has had approximately 24 hours for the paint to cure now so I don't need to worry about embedding fingerprints into the finish. I cut a mask for the letters out of clear vinyl so I could line them up perfectly on the edge of the guitar. I dropped a base coat of red to start as this was going to be my primary colour. I ran a fadeout strip of silver pearl across the top third and a fadeout of yellow across the bottom third. One thin strip of the red back across the centre to intensify the red again and it brought the pop back into it. The 1in5 lettering I kept with just red and black lowlights. Here it is


Well, after removing all of the masking, this is what it looks like before the finish coating which will be applied later on today. Looking like about 5 to 6 coats of clear should give a bullet smooth finish. Patience is going to be the hardest part of everything on this because the clear is going to have to completely cure before I can begin reassembly. I'm dying to see it all together.


Stay creative my friends.
Tuesday, 20 December 2011
Airbrushing for a cause part2
Well, here we are into day two of the guitar. I went over a lot of concepts of what I wanted to paint and had the designs drawn and ready to go. I found an awesome photograph on line from an inspirational quotes site that as soon as I saw it, I knew I had to use as a template. I laid it all out on the computer and it looked like this.


Okay. That stage completed, now on to the application of the paint. I masked off the upper section of the guitar in the shape of the earth so I could lay down a base coat of blue. The blue went on beautifully in one smooth coat. (Tip of the day-When spraying up against a mask, try to spray from the mask to the work. This will help prevent bleed under. It also helps prevent excessive build up of paint in a solid line when you peel the mask.) While the black was still masked off it was time to lay down the clouds. I did the clouds in about three different coats of varying levels of density and levels of white to give a 3 dimensional aspect. I start by going from dark to light. Over spray on the water blue wasn't an issue because I actually chose a more intense blue than the finished product required. When I was adding the clouds, I knew it would get dulled down considerably. With the blue and the clouds completed it was time to pull the mask off of the black. I like to see the slight glow of the atmosphere around the world so I wanted to add this next but I wanted it to be very subtle. I masked off the earth just slightly below the original mask line to prevent those build up lines I spoke of earlier. With a very dark dark purple, I laid down my "Ahem.....purple haze" I'm working on a guitar, yes I had to go there. This is how it looked at this stage.

I decided at this stage that the lettering was too detracting from the image. It can go somewhere else. Now I'm left with a large void that needed to be filled. Time to add the moon. It wasn't in the original concept but hey, creative control definitely has it's perks.Well, time to mask off the whole guitar again. Deciding on the size of the moon was the hardest part and the exact location to fit the layout. I decided on close to 3 1/2 inch diameter. I'm a perfectionist so I ran the circle through the vinyl cutter to make the mask. Quick, easy, and a perfect circle. After I located it, I masked off a bottom portion of it to allow for shadowing. After about 5 coats of different whites and greys, I was happy with the look and removed the mask. I went in and shadowed the bottom portion without a mask to allow a smooth bleed over. Here it is.

The black is still just a little too stark and empty for me so I added some stars with a paint brush just to break it up a little bit.

Well that's it for today, I want to let it cure before I start handling it too much as I still have the lettering to do. I'll update tomorrow with the latest progress.
Have an absolutely awesome day and stay creative my friends.
Airbrushing for a cause.
A couple of months ago I came across a charity that was starting up called I'm 1 in 5. During this time frame I had a huge contest going on in facebook trying to get my fan page up to 500 likes by November 30th. I fell short of the mark. That left me in a bit of confusion as I already had the prize. A Les Paul guitar that was going to have a personalized vinyl wrap on it. In the end I decided to donate the guitar and the design to the charity. I eventually decided not to vinyl wrap the guitar and airbrushed it instead. It's great having the programs and the technology to create just about anything under the sun, but every now and then, gotta go old school. Over the next few days I'll highlight and document all of the steps that I used to create a one of a kind masterpiece for a noble cause. The first step was removing all of the hardware. This was easy enough to do. I used to play oh so long ago. Or tried to at least. The neck is a body through so I had to mask it off which made things a bit more unmanageable but hey, it is what it is and you deal with it and move on. I masked off the cream inlay border as well. I really didn't want to try to remove the paint from it. A very crucial step was steel wooling the finish so the first layer of paint had enough grab. I sprayed a layer of flat black first to give me some undercoat and clean up any imperfections. To give me some bite for the airbrush paint, I sprayed a coat of black satin. Now my base coats were done and they were bullet smooth. The prep work is so crucial because if you shortcut on the prep, no matter what you do. It will never look right.


In the next post, I will start divulging into the airbrushing stage. Stay tuned and stay creative my friends


In the next post, I will start divulging into the airbrushing stage. Stay tuned and stay creative my friends
Sunday, 18 December 2011
A different application
The joys of working with vinyl are the limitless applications that it provides. I've been airbrushing for the last day and a half. I can remember the times when I did this without using vinyl and cutting the masks were a nightmare. Now if I want a specific shape I can do this out of a low tack vinyl and just send it to the cutter. Perfect every time. The uses of vinyl amaze me because just when you think you've seen it all, another use creeps up and bops you on the head. I still remember showing up at the emergency ward one time with a vinyl bandage. The doctor laughed at me but hey, it worked. I didn't have any bandages and it was something I had on hand. Sorry, bad pun. Never be afraid to try something new. If it works then you have one more thing under your belt. If it doesn't, then try it a different way. Don't be afraid to tell people what you know. The same can be said as well to approaching different crafting shows, Cut templates for stained glass windows. cut patterns to be applied to a substrate for quilting. The sky is the limit but that limit is determined by how far you want to go with it.
Stay creative my friends, 'till next time
Thursday, 15 December 2011
From start to finish
Got a message from one of my old customers yesterday. He was actually one of the first customers I had when I first started out. He recently fixed up his 4x4, raised it up about 8 inches or so and gave it a fresh new paint job. Onyx Black. What he needed from me was a specific 4x4 logo to put on the sides of the truck. Because all of the accents are chrome I suggested to him that we go a bit different than the standard grey that he had before and he loved it. I've got a bunch of 4x4 decal designs but he had a specific one in mind. He sent me the email with the picture and the dimensions he wanted and we were off to the races. The picture he sent me was in jpeg form so the first thing I needed to do was convert it to a vector.


I imported the image into the node editing software I use and started at it. The resolution of the graphic isn't the best but I figured I would try the tracing function just in case to save myself the time.

The traced drawing is in blue to make things easier to distinguish. It's a pretty good trace but lacking in some of the details that make this graphic unique so I decided to draw it from scratch.

Starting off with a box is the easiest way to create what I need. To work further with it I then need to convert it to curves to add nodes. Nodes are like little intersections in a line path that allow you to change the direction of a path.

The red lines are the initial trace lines to outline the object. The lines are straight so I need to change them individually to curved lines. These curved lines can be manipulated into a more accurate representation of the graphic.

The little arrows coming off of the node points are called handles. These handles are what allow you to be able to manipulate the curved line. By moving the tip of the arrow, you change the shape of the curve from a wide arc to a short bend.

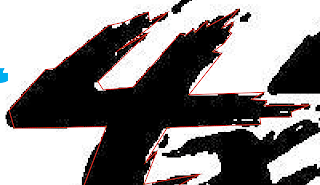
And here we have a finished 4 which is a lot more accurate to the original.

The blue drawing is the trace, the red is my drawing, and the black is the original. Well worth the extra time and effort not to mention the customer satisfaction level. The next step we need to do is remove the other 2 components from the drawing and remove all colour. This leaves only an outline for the next step.

Much of the cutting software out there uses Adobe Illustrator files so I save the file as an AI version 3 format.
I've found that it is the most compliant conversion. The next step is to open up the cutting software. Personally I use SignGo Pro as my choice of cutting software. The price point, ease of use, and flawless operation is extremely beneficial. Select the file from the saved location and drag it onto the working area.

Select the cutting option and a window will open up.

The layout section shows the dimensions of the drawing, It also allows you to cut multiple copies. I will be cutting 2 of these but will cut 1 at a time for this run. After all of your settings are where you want them you select the cut tab.

Everything looks good so I select start and let the cutter run it's magic.

I didn't select a weeding border around this image but if I was running multiple copies I surely would have. A weed border cuts a box around the object that separates it from the next object. For single images this is okay but for multiple images, pulling back a large amount of vinyl will often lead to disaster. The extra couple of seconds on the cutter could save you a lot of aggravation.

After weeding the excess vinyl, apply the transfer tape and contact the customer. He loved it and in the end that is what is most important. A happy customer is a repeat customer.
Have a great day and stay creative my friends.
Wednesday, 14 December 2011
Not quite common knowledge
One of the most common misconceptions many of my customers and other people I speak with have is that you can just cut a file from a jpeg or a bmp file. Nothing could be further from the truth. The type of file that is needed to cut vinyl is called a vector file. Many sign makers out there use various sign making software to accomplish this. Some of the most commonly known are Coreldraw and Adobe Illustrator. I looked up the definition of vector in Wikipedia and it confused even me. A vector in the simplest terms is a measurable object (in inches or centimetres) when drawn. When you enlarge a vector file from a business card size to a billboard size, there is no degradation of the image. Not so even with the highest resolution jpeg. All of the jpegs I get, I have to redraw as a vector file. At times this can be a highly time consuming process. There are some vector tracing programs that work really well but the quality of the trace is highly dependant on the dpi of the image being used. As time goes on I will show some of the basics to creating a vectored drawing, using cutting software, and running a file through the cutter.
Sunday, 11 December 2011
What goes into layering vinyl
We got a call yesterday from a customer all in a panic. They needed a sign to take with them to a relatives to give them before Christmas. They remembered me from my facebook page and gave me a call. Panic part was they needed it tonight. I went over with them the supplies I had available to be able to give them what they wanted in a very condensed time frame. Quickly got to work on the design and had approval within a couple hours. Off to the races to get the alumicor cut to the right dimensions. The great part is they wanted something done that I love doing, layering vinyl.
After getting the initial layout and design completely nailed down it was off to the vinyl cutter. I cut the black in the exact locations that they were being transferred over to save time and measuring. It was being used as the bottom layer so alignment was critical. The second layer cut was chrome. To save on vinyl I was able to line things up to maximize the yield. Chrome is a lot more expensive than black so saving wherever you can is key.

This is what the vinyl looks like when it first comes off of the cutter, next step is weeding the excess vinyl from the page.


The next step involved is transferring the chrome to the black. I was able to eyeball the locations pretty easily because I use a clear transfer tape. For more intricate patterns or more than two colours I would have made registration marks on the file to assist with the alignment. A little trick to help with multiple layering is to deaden the tackiness of the tape by placing it on your pant leg or shirt so you can more easily remove it from the graphic to add the next layer without pulling up your existing work.

Place the transfer tape onto the components that you are ready to transfer but keep the tape smooth. Use your squeegee to press the vinyl onto the transfer tape and peel it up off of the backer. Go slowly. Saving time by going fast will not save you money in this stage. Make sure that the black layer is held down and flat when lining up the graphic because there is a static charge to both the vinyl and tape . You don't want any inadvertent contact. Line it up and smooth it down with the squeegee and it will look like this.

After you've lined up and stacked all of the components they are ready to transfer over to the final substrate. Another job completed. Another satisfied customer.

A bit of a side angle shot really shows how well the layers look and bring out the 3d aspect.

Enjoy and stay creative.
Thursday, 8 December 2011
The trials and tribulations of starting your own sign business
In this day and age of economic turmoil, many people have shut down their businesses to move on and try something new. I can't say I blame them as I've thought of doing the same myself many times over. I think the largest reason I didn't give up on my dream was due to the support I've always had as well as the loyalty my customers have always shown me through the years. It was around this time last year when I looked at my wife and said I was done with it all. She saw how heartbroken I was just uttering the words and asked me to hold on and give it another run. Wouldn't you know it, the next day I had a new customer approach me asking me to do a banner for them. The rest as we say is history and I've never looked back since. Here at Christoff Creations we create one of a kind vinyl graphics that are second to none in quality. I have always leaned on others to help me with learning tips and tricks to using the different software we've tried over the years. I want to give back now in that regard. As we give a look into the day to day we will also help with some of those tips and tricks that we've learned along the way.
Subscribe to:
Posts (Atom)