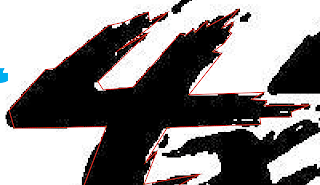
I imported the image into the node editing software I use and started at it. The resolution of the graphic isn't the best but I figured I would try the tracing function just in case to save myself the time.
The traced drawing is in blue to make things easier to distinguish. It's a pretty good trace but lacking in some of the details that make this graphic unique so I decided to draw it from scratch.
Starting off with a box is the easiest way to create what I need. To work further with it I then need to convert it to curves to add nodes. Nodes are like little intersections in a line path that allow you to change the direction of a path.
The red lines are the initial trace lines to outline the object. The lines are straight so I need to change them individually to curved lines. These curved lines can be manipulated into a more accurate representation of the graphic.
The little arrows coming off of the node points are called handles. These handles are what allow you to be able to manipulate the curved line. By moving the tip of the arrow, you change the shape of the curve from a wide arc to a short bend.
And here we have a finished 4 which is a lot more accurate to the original.
The blue drawing is the trace, the red is my drawing, and the black is the original. Well worth the extra time and effort not to mention the customer satisfaction level. The next step we need to do is remove the other 2 components from the drawing and remove all colour. This leaves only an outline for the next step.
Much of the cutting software out there uses Adobe Illustrator files so I save the file as an AI version 3 format.
I've found that it is the most compliant conversion. The next step is to open up the cutting software. Personally I use SignGo Pro as my choice of cutting software. The price point, ease of use, and flawless operation is extremely beneficial. Select the file from the saved location and drag it onto the working area.
Select the cutting option and a window will open up.
The layout section shows the dimensions of the drawing, It also allows you to cut multiple copies. I will be cutting 2 of these but will cut 1 at a time for this run. After all of your settings are where you want them you select the cut tab.
Everything looks good so I select start and let the cutter run it's magic.
I didn't select a weeding border around this image but if I was running multiple copies I surely would have. A weed border cuts a box around the object that separates it from the next object. For single images this is okay but for multiple images, pulling back a large amount of vinyl will often lead to disaster. The extra couple of seconds on the cutter could save you a lot of aggravation.
After weeding the excess vinyl, apply the transfer tape and contact the customer. He loved it and in the end that is what is most important. A happy customer is a repeat customer.
Have a great day and stay creative my friends.


That looks great in chrome. Bet he's gonna love it!
ReplyDeleteHe absolutely did Jamie. I just can't wait to see it on his vehicle.
ReplyDelete